Hiking Pico Ruivo does not have to mean tackling Madeira’s long ridge walk from Pico do Areeiro. The shorter PR1.2 route from Achada do Teixeira reaches the same summit with less walking and simpler transport arrangements. For visitors who want the summit rather than a full mountain crossing, it is the more practical choice.
Pico Ruivo stands at 1,862 metres, the highest point in the Madeira archipelago. The direct approach covers 2.8 kilometres each way and carries a moderate difficulty rating in the official PR1.2 route details. Choose your route around fitness, comfort with heights and the mountain forecast, not just the photographs.
Check Pico Ruivo Access Before Planning Your Hike
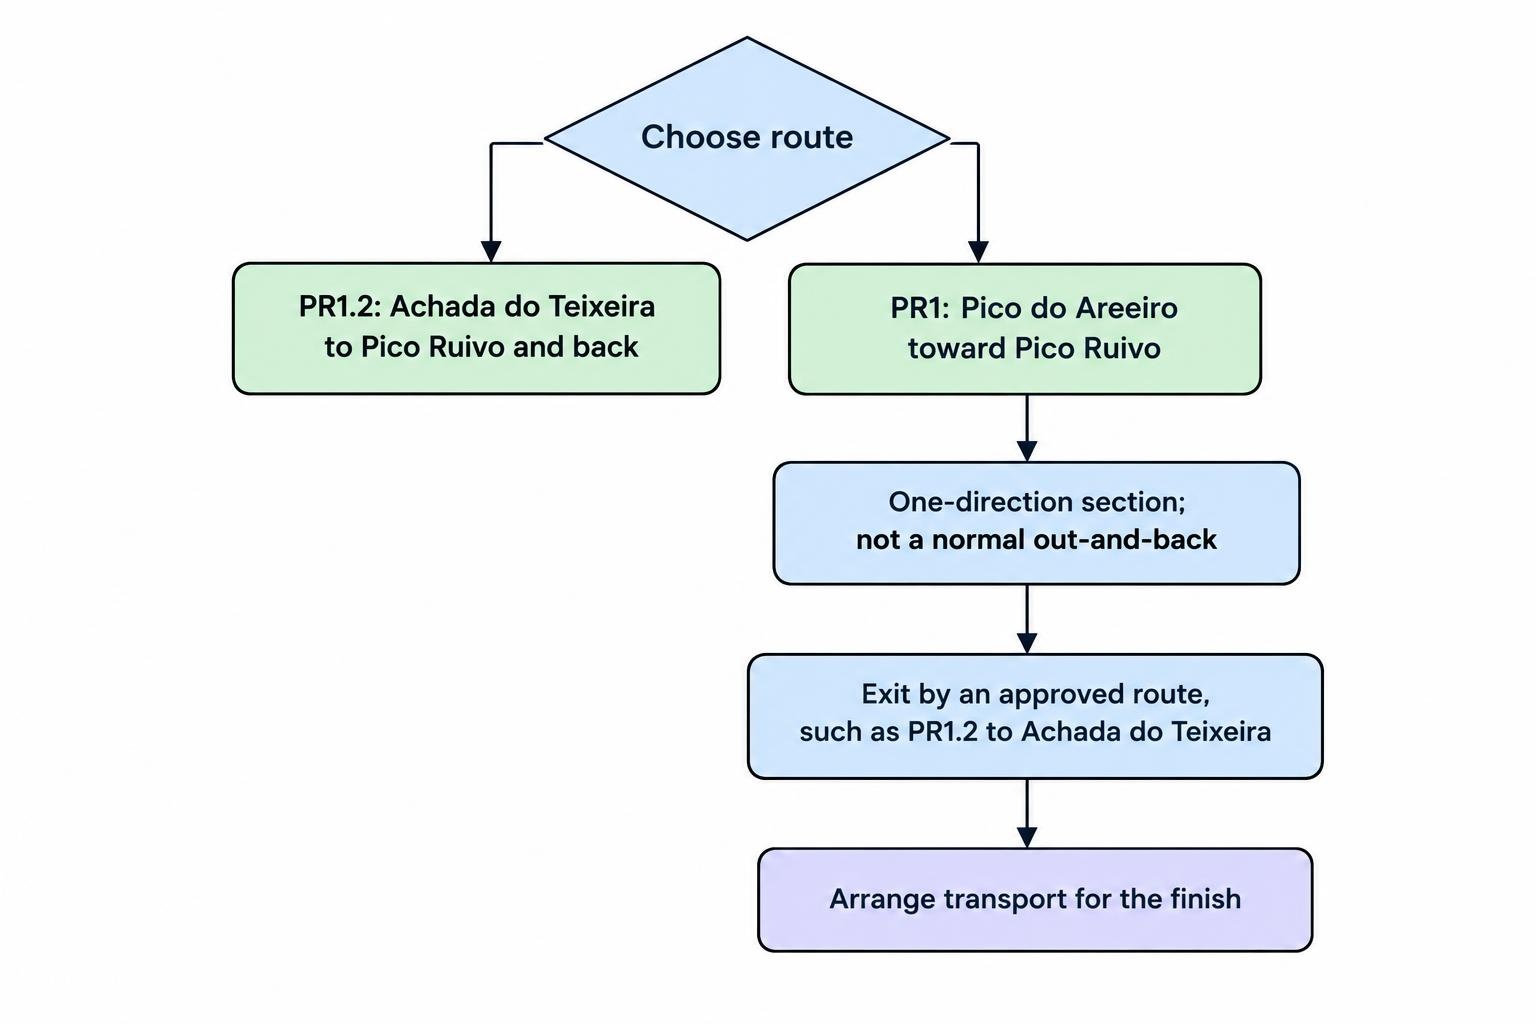
As checked in October 2026, the official listings show PR1.2 from Achada do Teixeira and PR1 from Pico do Areeiro open. However, PR1 operates in one direction from Pedra Rija to Pico Ruivo: you must travel from Areeiro towards Ruivo, then leave by an approved exit route. You cannot plan a normal return hike along that section.
PR1.3 towards Encumeada remains restricted and should not be treated as an available through route from the summit. Check the IFCN trail status and access restrictions again before departure. An open route listing does not replace the weather check, and an old walking report does not override a closure sign.
This matters most when arranging transfers. Confirm the walking route first, then reserve transport around its permitted direction and your entry time. Otherwise, you risk booking a pickup from somewhere you cannot reasonably reach.
Which Pico Ruivo Route Should You Choose?
The main decision is between a shorter summit walk and a longer mountain traverse. Both reach Pico Ruivo, but they are different outings.
| Route | Walking distance | Practical difficulty | Suggested time allowance |
|---|---|---|---|
| PR1.2 from Achada do Teixeira and back | 5.6 km return | Moderate mountain walk | 2–3 hours, including stops |
| PR1 from Areeiro, finishing via PR1.2 at Achada do Teixeira | About 9 km in total | More demanding, with sustained climbing and descending | 5–6 hours, including breaks |
These time allowances are planning suggestions rather than official walking times. Give yourself more room if you move cautiously on steps, stop often or want a long summit break. Neither estimate includes the journey to the trailhead.
PR1.2: Achada do Teixeira to Pico Ruivo
Choose PR1.2 if reaching Madeira’s highest summit is your priority. You start at Achada do Teixeira, walk to Pico Ruivo and retrace the route. Returning to the same trailhead removes the transport puzzle that comes with a traverse.
The route passes shelters and approaches the Casa de Abrigo do Pico Ruivo area before the summit. Follow the signs carefully around the connecting paths; several mountain routes meet here, and a downhill path is not necessarily your downhill path.
The official return estimate is 1 hour 30 minutes. Treat that as a walking reference, not a deadline. A slower pace leaves time to manage the climb comfortably and enjoy the summit without immediately checking your watch.
This is also the better starting point for someone uncertain about a longer mountain hike. You still need suitable footwear, warm layers and a willingness to abandon the summit if conditions deteriorate. Shorter does not mean weatherproof.
PR1: Pico do Areeiro to Pico Ruivo
PR1 is the longer option for walkers who want the ridge experience as well as the summit. The route includes tunnels, steep slopes and stairways around the central mountain massif. Its published distance is 6.1 kilometres to Pico Ruivo, before your onward exit walk, as listed in the official Vereda do Areeiro route description.
Do not mistake the relatively small difference between the two summit heights for an easy crossing. Descending between peaks creates climbing that a simple start-to-finish altitude comparison hides.
For a finish at Achada do Teixeira, continue down PR1.2 after visiting Pico Ruivo. Arrange your collection there rather than at the summit, which has no road access. Confirm that your booking covers the full PR1 crossing, not just the shorter Areeiro–Pedra Rija section.
Other Approaches and Exits
PR1.1 connects Pico Ruivo with Ilha and provides another exit option when open. It is a separate mountain route, not a small detour back to Achada do Teixeira. Only choose it with a complete route plan and transport arranged at the correct finish.
For a first visit focused on the summit, there is little reason to complicate matters: use PR1.2, or commit to the longer PR1 crossing with its transport arrangements settled beforehand.
Getting to Achada do Teixeira
For the shorter hike, enter “Achada do Teixeira” as your destination rather than simply “Pico Ruivo.” Save the trailhead location before leaving your accommodation and allow a generous margin between your expected arrival and booked entry.
If you drive, include time to park, put on walking shoes and check your equipment. Arriving at the parking area at the exact minute of your slot leaves no room for an ordinary delay. Review the practical advice on driving Madeira’s hills and mountain roads if you are unfamiliar with the island.
Without a car, arrange a transfer, taxi or guided outing that explicitly serves Achada do Teixeira. Confirm the return meeting point and what happens if weather forces cancellation. For PR1, be equally clear that your start and finish are different places.
Entry Fees and Reservations
For independent visitors without an exemption, the published 2026 fee is €4.50 for PR1.2. The full PR1 crossing costs €10.50 and includes access to PR1.2 and PR1.1, so you should not need another trail fee simply to descend to Achada do Teixeira.
Reservations use entry time slots through SIMplifica. Registration is mandatory even for visitors who qualify for a fee exemption, including children aged 12 or younger. The IFCN reservation and fee rules cover exemptions, booking requirements and the distinction between the full PR1 ticket and the shorter viewpoint option.
Complete the booking before travelling to the mountain and save the confirmation offline. Check the route name, date, entry time and number of walkers. A payment receipt for the wrong trail is not much use at the trailhead.
If you book an organised outing, ask whether trail registration and entry fees are included. Do not assume that paying for transport also reserves your walking slot.
How Difficult Is Hiking Pico Ruivo?
For route selection, separate three questions: can you manage the distance, can you handle repeated climbing and descending, and are you comfortable walking in an exposed mountain setting? Being comfortable with one does not automatically answer the others.
PR1.2 is the more manageable option, but plan around the slowest person in your group. For anyone with knee trouble, the descent deserves as much thought as the climb. Walking poles may help with balance if you already know how to use them.
For families, judge readiness by previous walks rather than age alone. Can the child manage the full return distance, follow instructions near edges and cope with a cold stop? If not, choose another outing rather than turning the summit into a negotiation.
For PR1, assess your comfort with stairs, tunnels and long stretches of mountain walking. A guide can assist with pacing and decisions, but cannot remove the physical demands or guarantee suitable weather.
Weather: Check the Mountain, Not Just Funchal
Check IPMA weather warnings for Madeira’s mountain region before setting out. Use information relevant to the high ground rather than relying only on a coastal forecast. Pay attention to wind, rain, visibility and temperature, not just the chance of sunshine.
Make two decisions: whether to travel to the trailhead, and whether conditions there justify starting. A reservation is permission to enter at an allotted time, not an instruction to walk regardless.
Choose another activity if strong gusts, poor visibility or wet conditions exceed your comfort and equipment. Do not cross a barrier to investigate whether a closed section “looks fine.” The problem may be well beyond the first bend.
A clear start also does not guarantee clear summit views. Build enough flexibility into your itinerary to move the hike rather than forcing it into the only free morning.
What to Wear and Carry
Pack for walking uphill and stopping in cooler, windier conditions. Wear shoes with dependable grip and carry a warm layer and waterproof outer layer. Choose clothing you can adjust without unpacking the whole bag.
- Water and food: Carry enough for the complete outing, with a reserve for delays. Do not make the plan depend on buying refreshments.
- Navigation and confirmation: Save your route map, trail booking and transport details offline.
- Lighting and power: Bring a headlamp and a charged phone; carry backup power for a longer day.
- Weather protection: Pack sun protection, a warm layer and rain protection appropriate to the forecast.
- Basic supplies: Include personal medication, blister care and a small first aid kit.
For clothing that also works elsewhere on the island, use the broader Madeira packing guide. On the mountain, keep the bag practical: useful layers earn their place; spare outfits for photographs do not.
Do not rely on shelter facilities, toilets or water supplies without checking their availability. Plan to be self sufficient for the walk.
Sunrise, Sunset or Daylight?
A daylight hike is the simplest choice for a first visit. It lets you assess the route and weather without adding darkness to the planning.
If sunrise is your goal, confirm that your permitted entry time allows it. Work backwards from sunrise using a cautious uphill estimate, then add time for parking and preparation. Every walker needs a proper light, not one phone torch shared between several people.
For sunset, plan the return before starting. Reaching the summit just before the light fades still leaves the descent. Set a departure time from the top and stick to it, even if the sky is only beginning to cooperate.
Know When to Stop
Before leaving, tell someone which route you are taking, where you expect to finish and when they should hear from you. Keep your group together and check signs at junctions rather than following whoever happens to be ahead.
On PR1.2, abandon the summit if the weather, footing or someone’s energy makes the return doubtful. On the one direction section of PR1, do not improvise a reverse route or an unsigned escape. Seek assistance if continuing safely becomes impossible.
For an emergency, call 112, listed in the Madeira Civil Protection operational and emergency information. Be ready to give your route number, location, direction of travel and the nature of the problem.
For most visitors whose main aim is Pico Ruivo’s summit, PR1.2 offers the clearest plan: the same start and finish, less walking and fewer transport decisions. Choose PR1 for the longer mountain experience, not because it appears on more itineraries. If conditions rule out either option, use the wider Madeira hiking guide to reconsider the day rather than forcing the summit.